Easter is just around the corner, and Facebook Live offers a reliable way for churches to put in place a coronavirus contingency plan.
Facebook Live has already been around for 4 years and we can say that it is a great success.
Nearly 2 billion users , that is, almost the entire Facebook community, saw a live video. 100 million of them participated in a Live Facebook.
Method 1
How to go live on Facebook using mobile devices
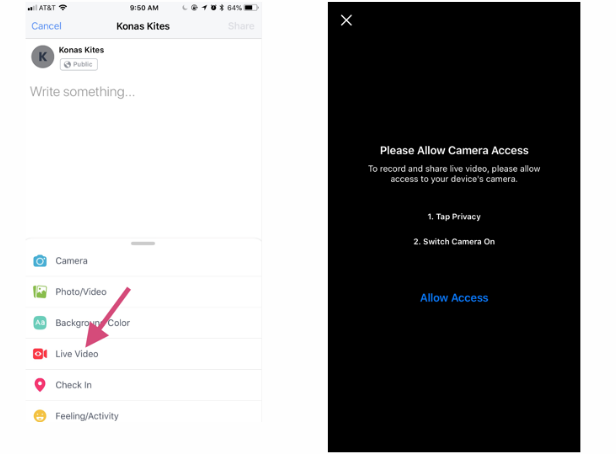
a. Go to your Facebook News Feed and press the Live option (the camcorder icon)
b. Write a video description
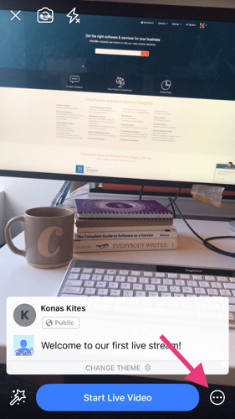
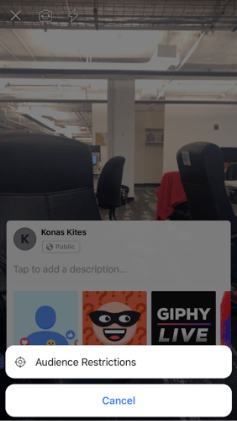
c. Select a privacy setting by tapping the ellipsis in the bottom right corner and opening up Audience Restrictions
d. Press the “Start Live Video” button
e. Publish your Facebook live
a. Go to your Facebook News Feed and press the Live option (the camcorder icon)
Log in to your Facebook account. You can go live from your own Facebook profile or business page. Open up the status bar (as if you’re going to write a regular Facebook status) and select the Live Video option (also denoted by the same camcorder icon).
You’ll be prompted to give Facebook access to your camera and microphone. If you don’t allow this, you won’t be able to go live.
As soon as you approve it the first time, you’ll stop seeing these prompts.
b. Write a description
This step is important to draw viewers in and make them watch your live-stream. The description will show up on Facebook users’ timelines above the video, so make sure it grabs their attention, is clear and has all the necessary information. When you’re writing your description, you can also tag people.
c. If you’re posting from a personal Facebook account, select a privacy setting
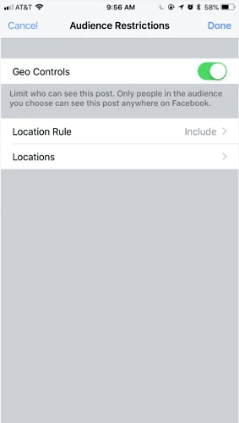
If you’re posting from a Facebook business page, your Facebook Live video will be public automatically. Frankly, you’d probably choose this option anyway, because live streaming is all about connecting with your audience and being seen! However, you can restrict your audience by location, using Facebook’s audience restrictions.
To do this, click on the ellipsis button in the bottom right corner. Click on Audience Restrictions. Then, switch “Geo Controls” on, and use the Locations tab to select the locations that you want to either include or exclude. Be sure to change the Location Rule tab depending on which option you select!
Note - It must be noted that unlike the Web Version of “Facebook Live”, the app does not allow the users to schedule live sessions in the future.
To do the same, users must either schedule the live video from Facebook web (which is discussed further below) or create a scheduled “Event” on their page from the app.
To do this:
1. Open your Facebook page.
2. Click on “Events” beside the “Home” tab. Click on Create Event.
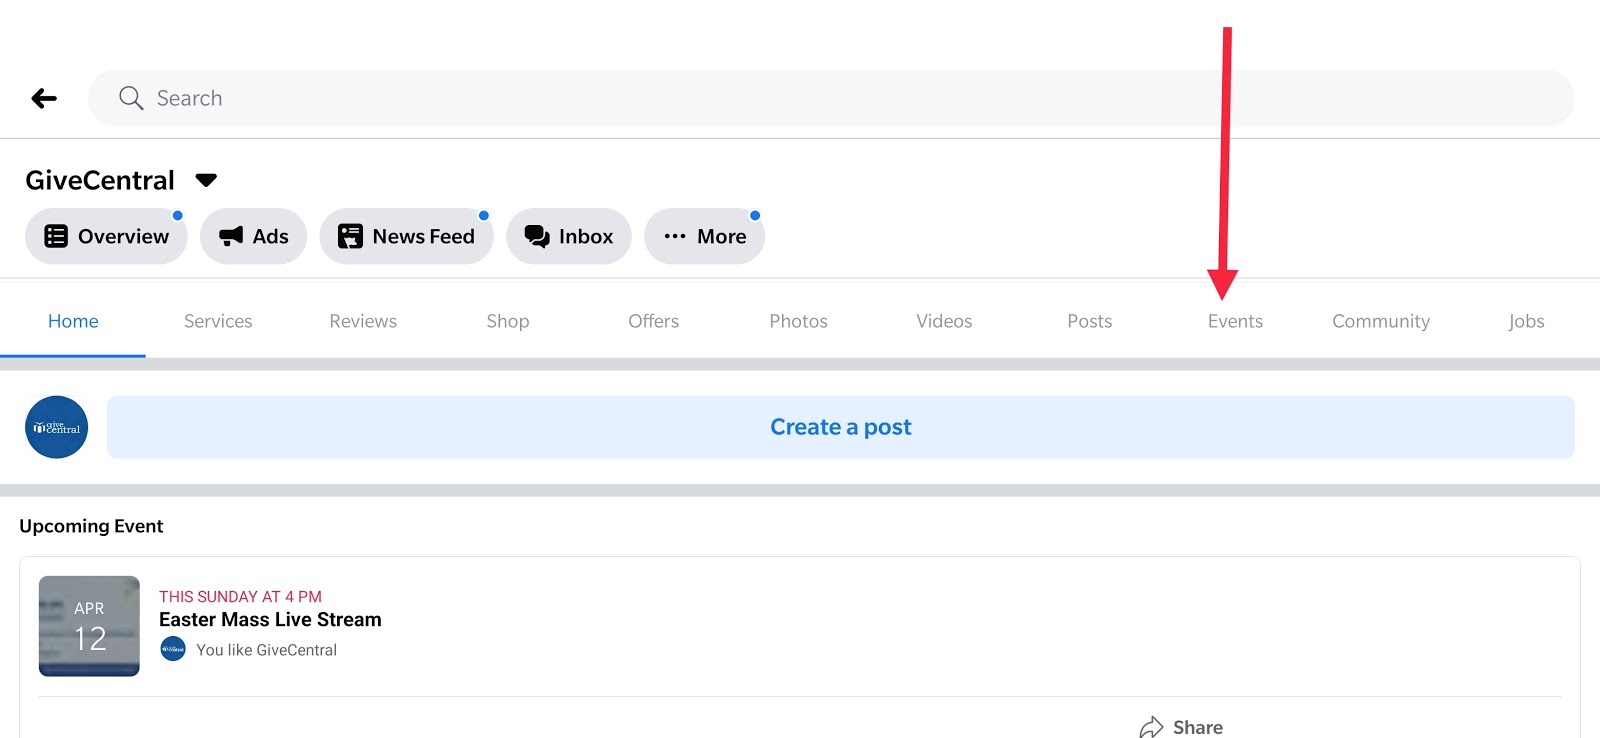
3. Add a recognizable name to the event, for example, Easter Mast Live Stream.
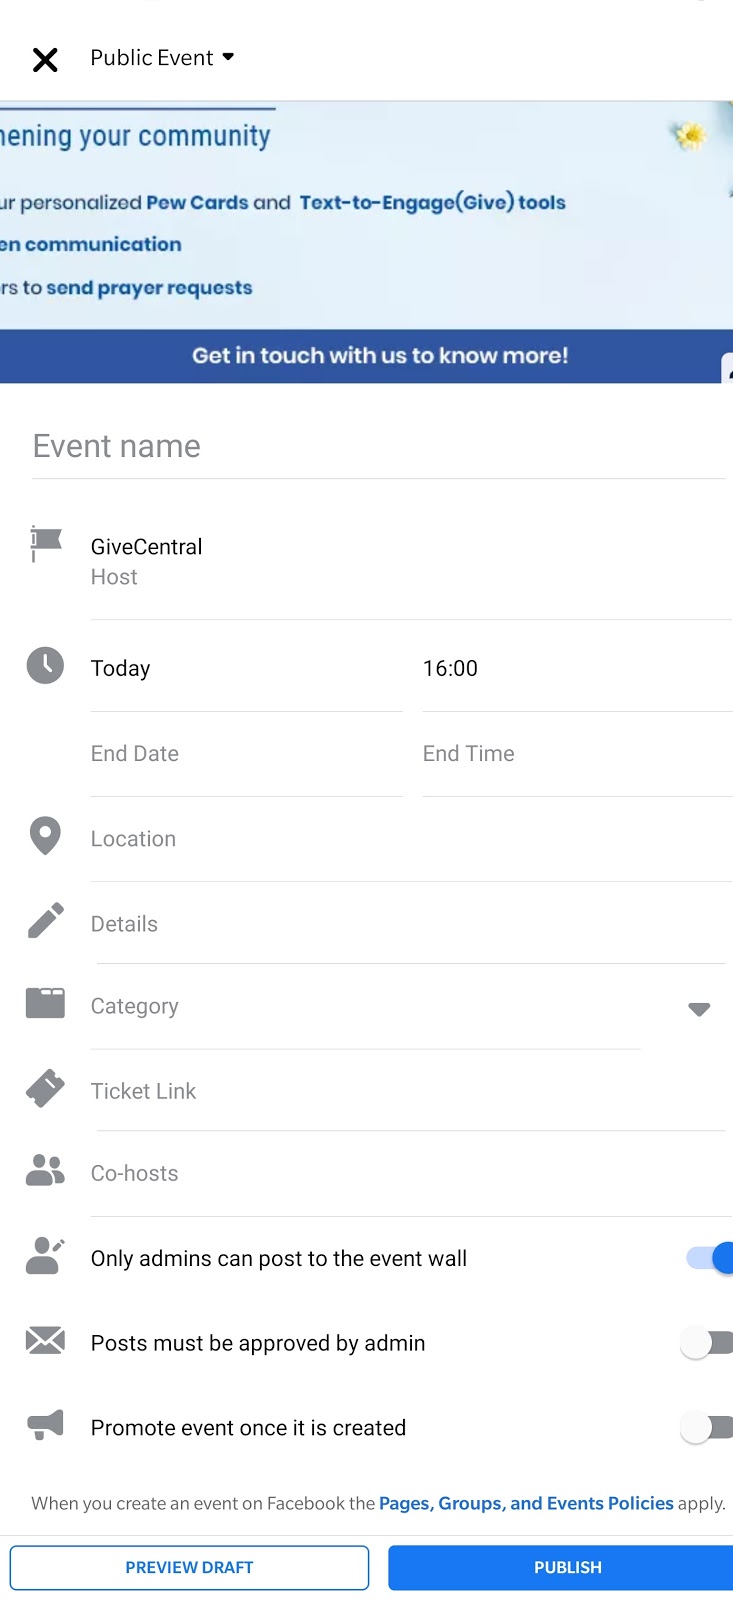
4. Fill in all the details and check the privacy.
5. When you are done, Publish the event on your page.
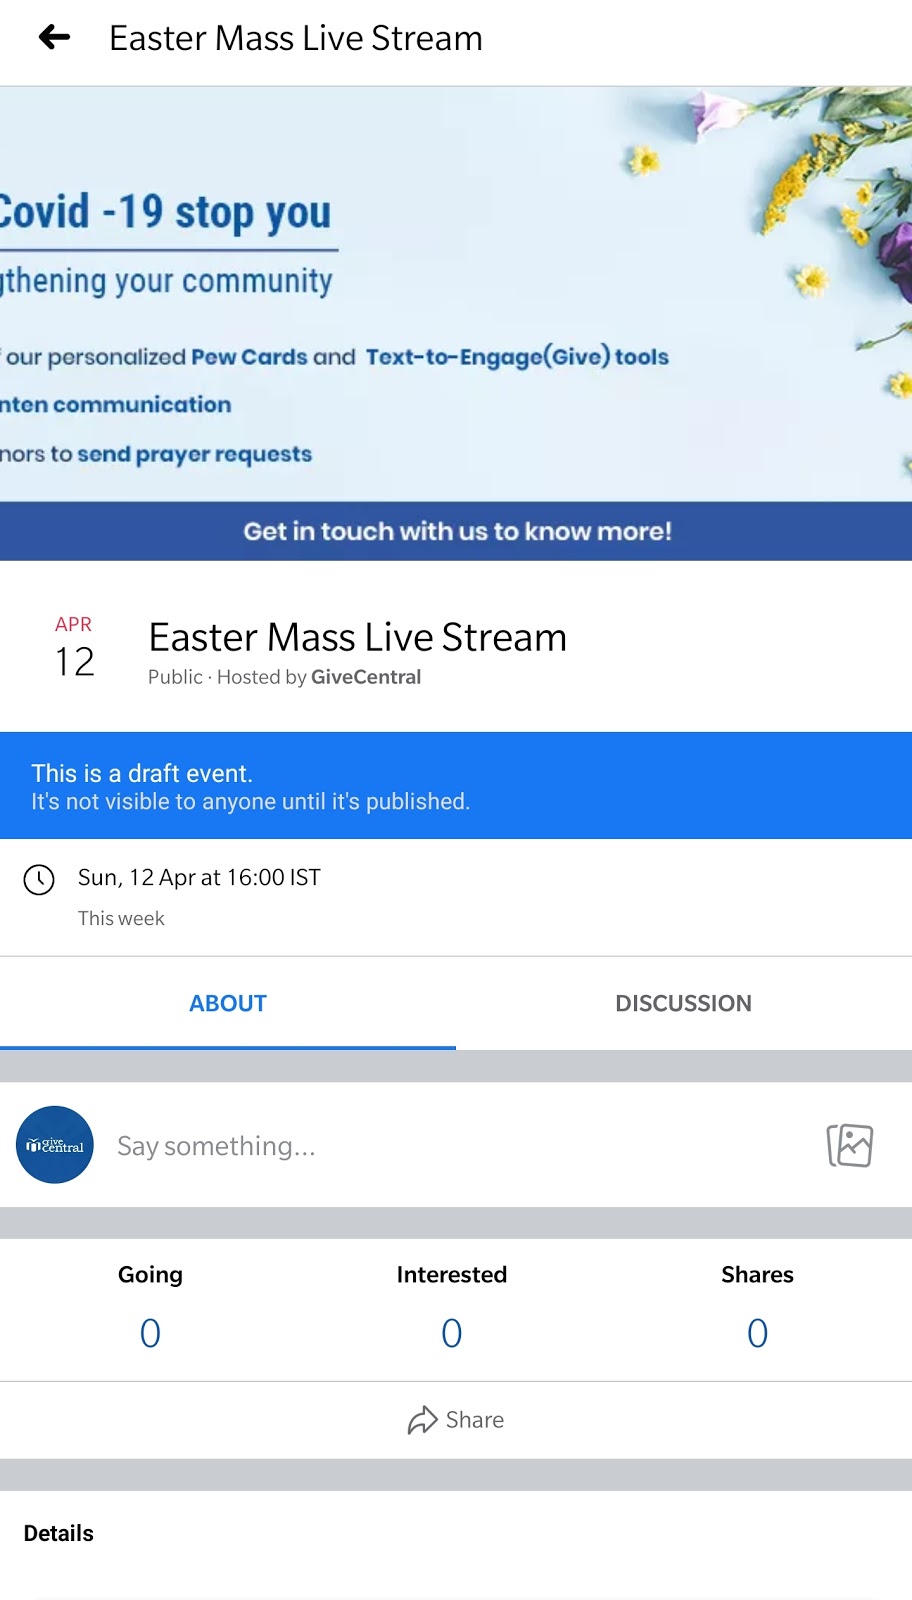
d. Start your Facebook Live video!
Make sure your camera is facing the correct way (use the camera button in the top left corner to switch from your outward-video camera to your selfie video camera, and vice versa). Ensure that your subject is in place and click on the blue “Start Live Video” button to begin your mass online.
Once you do this, you are live. Your video will begin to appear in your own feed, and the feeds of your audience members. In the top left corner, you’ll see how long you’ve been live for. Facebook Live streams can be up to 90 minutes long.
e. Publish your Facebook Live
After pressing the “Finish” button, Facebook asks you if you want to:
- Record the video and keep it in your mobile memory
- Keep your Facebook Live and publish it
- Delete video
f. Adding your logo to your Facebook live stream.
Brand your Facebook Live productions by adding a full-screen logo at the beginning of the broadcast, or insert an overlay of your logo as a "bug" to the corner of the live video. This is the quickest way to add value to your new digital marketing asset.
Recording is a great feature because anyone who has not been able to see you live will be able to watch it at any time.
Method 2
Using Facebook live on desktop to live-stream Easter mass.
a. Go to your Facebook page
b. Allow Facebook to use your microphone and camera
c. Prepare your Live and press "Live Stream" to start!
d. Stop Live Streaming
a. Go to your Facebook page
It is the same principle as for a Facebook Live via mobile.
Click the “Live” button above the bar.
b. Allow Facebook to use your microphone and camera
Again, Facebook will ask you for permission to use the camera and microphone on your computer.
c. Prepare your Live and press “Live Stream” to start !
If you manage multiple Pages, be careful to select the correct Page.
Then you can specify a description and title for your Facebook Live.
You can also click on “Share screen” to share your screen, but if you do, you will not be able to change the view during the live
d. Stop Live Streaming
Did you say goodbye to the participants?
Now click on the red “Stop Live Video” button at the bottom right of your screen.
It’s very simple to launch a live broadcast on Facebook. Now let’s optimize online giving for your fundraiser.
During the event, make sure you use the chat feature to share the link to your fundraising page with your supporters and guide them through the process of making a donation.
Did you know? You can pin the link to your giving page on Facebook live stream. By doing this, you always keep your link on top of the conversation thread and it doesn’t get lost. Your donors, at the end of the mass, do not have to search for the link to donate.
Here are the steps to do the same:
a. Click on “Go Live” on your Facebook Page/Profile.
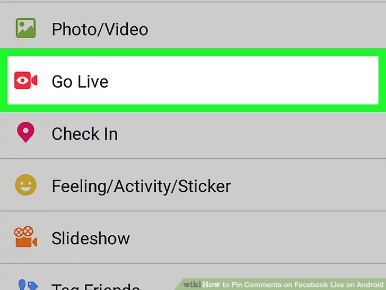
b. Tap Go Live to start your broadcast. Now that you’re broadcasting, viewers will be able to see the description and can start commenting on your live stream.
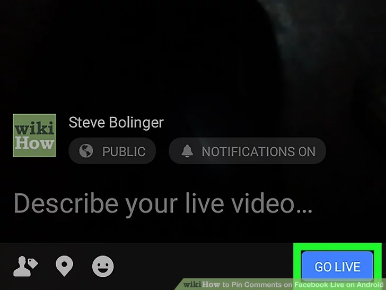
c. 3. There are two ways to add a link.
- Add the link in the description section:
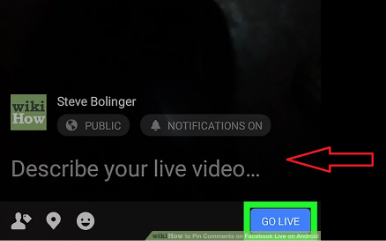
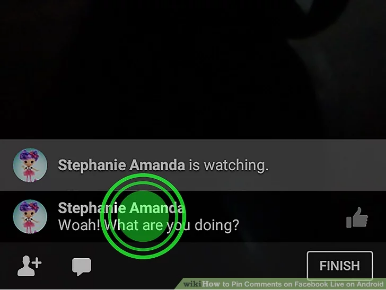
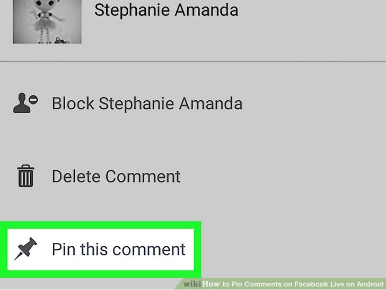
- Pin the link as a comment. For this you must:
1. Tap on the comment you want to showcase
2. Select Pin this Comment
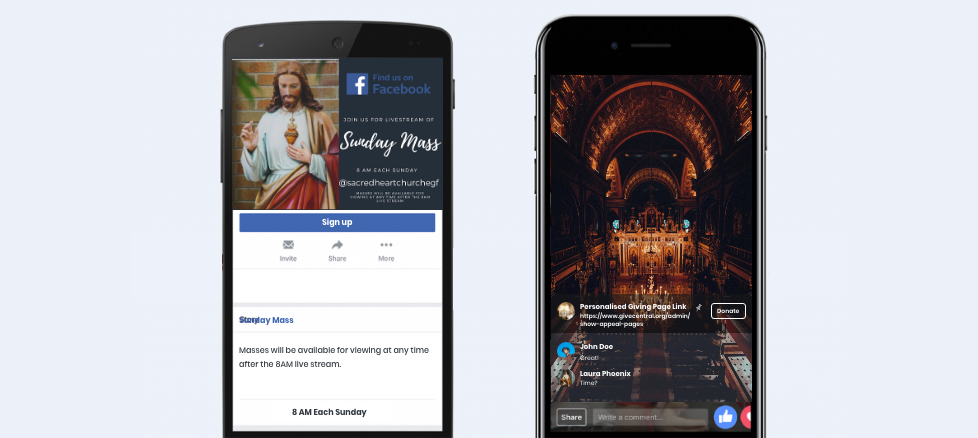
If you do not already have an Easter event page, set up a completely customized giving page (including the email responses!) - this process can be completed the same day!
The link can be live and used
- On the Diocesan website
- Individual parish websites (especially those without online giving!)
Best Practice: Promote the live video beforehand. Although anyone who follows your page receives a notification when you go live, that notification isn’t enough to reap the full benefits of your live video. Make sure you tell your parishioners details (day, date, time) through emails, website notifications, sms, so that they can remember to tune in.
Use these sample templates to draft your communications:
Sample Messaging within an email:
As we continue our Lenten journey, consider how you are using these forty days to prepare for the coming of Christ. Please continue to share your prayer requests. Please continue to invite others to engage with us by sharing this email and this link. Please continue to support our ministry online and via text [INSERT TEXTING INFO AND KEYWORDS]
Sample Messaging within a video stream:
We are blessed by your commitment to our faith community. To that end, I would ask each of you to share your live stream video with your community and this number %TEXTING_PHONE_NUMBER% and encourage everyone to use the keyword “QUICK” to share prayer requests and contact information. We are trying to reach out so that we can help each other and pray with each other in this time of need. I also ask you to consider remembering your parish at this time. Using %TEXTING_PHONE_NUMBER% and the keyword “SUNDAY”, you are able to continue to support our ministry.
You could also include your texting number and a link to donate on your homepage and share this link with your supporters.
OFFERTORY
After the Gospel and Prayers of the Faithful, which is the traditional time for Offertory. You can share your %TEXTING_PHONE_NUMBER% along with the keywords "Sunday" and "Quick" for your community to share their gifts for your ministry. Ideally you can do this with the number showing on the screen.
AT THE END OF THE LITURGY
I would also show that information again at the end of the liturgy. You can share your %TEXTING_PHONE_NUMBER% along with the keywords "Sunday" and "Quick" for your community to share their gifts for your ministry. Ideally you can do this with the number showing on the screen.
This video guides you on how to find your sharing links on GiveCentral dashboard and add them to your live stream.
End your show with a call-to-action.
Also, you can prepare a call to action to offer participants to:
- Share the show
- Subscribe to notifications to be notified of the next Lives
- Subscribe to your Newsletter
- Donate
Not all your donors might have a facebook account. After your live video is over, follow up by sharing your recorded event with donors via emails. Make sure to include this link of your personalized giving page and guide donors to make a donation.
For donors who are not online, share these links asking them to register or update their profiles.
During this time of uncertainty in our Catholic communities nationwide, GiveCentral wants to offer its service and assistance to you and your parishes. GiveCentral allows your parishes, schools and agencies to take in online donations, now, and into the future.
Utilize GiveCentral’s state-of-the-art text-to-engage (advanced text-to-give!) and Express communications - We can help you send out communications to your donors which allow for “one click” giving. Sample templates which can be easily modified are included on this link for your reference.


